Saturday, June 11, 2016

Revisiting an older painting


"Green Hope River" 12" x 14" in private collection

I ran across a painting from a couple of years ago, and remembered I had done photos during the process, for a future blog. I am now posting it, with some "hindsight is always 20-20" comments!
This is using a photo from our trip, in 2015, to England. We stayed at a wonderful series of B and B's, some were "Pubs with Rooms" and all were very special in their own way. This was called "Green Hope Guest House, in northern Yorkshire. It was back a LONG farm track, but when we got there, it was a gorgeous stream-side garden-strewn home. I took this photo looking back along the stream, toward the pastures and treeline, early morning, the day we left. This is the reference photo.
The road on the right fords crosses a little rivulet, then up a hill on the way out of the farm. Those people are our friends, David and Diane, with whom we did our 2500 mile driving trip all over England and a little bit of Scotland.
I knew I did not want to paint the whole view, too much going on, so I did a few thumbnail sketches to get the value shapes I thought would work. The one on the upper left became two other paintings, but I decided for this larger one, I wanted the one at the bottom of the page.
Step 1. Thumbnails. I chose the sketch which shows just a bit of the treeline on the left, the lovely stream, and the fields, with a hint of a fence, above the darker stream bank. It is a river, actually, but I forget its name!
Next I did an underpainting, using complimentary colors so the mostly green scene would have a little "punch.
Step 2. I am using complimentary colors, painting the warmer reds, yellows on the foreground, and the cooler blues and purples in the background, to emphasize the distance. These will be seen in little glimpses, under the many greens of the picture.
I am showing a close-up of the top of the painting here
Step 3. Beginning to apply more pastel in the local colors. You can see I have begun to block in the sky. It was a day with mixed sun and clouds, but , as for the whole trip, a mostly sunny day, later on, as we made our way to Edinburgh.
I had decided I did not want this painting to be just GREEN, so I am going to underpaint warmer colors to begin.
Step 4. Here I am using warm yellow ochre, other warm yellows, and a little dark reddish violet, in the closer fields and stream bank, with a little yellowish green on the near bank, where there are a lot of shrubs. 
I have also blocked in the light blue haze in the distance, and some cool blue greens of the far stands of pine trees. I will continue to add color, to build up the pastel to where I think I will finish with the greens.
Step 5. I am working to make the scene feel warm and mellow, with the use of all the rich yellows, yellow-greens, and greenish blues . I have also put in the blues of the river water, and a little more definition of the shrubs along the stream in the back right, at the river's curve.
 NOTE; When rediscovering these photos of the steps for this painting, I am really regretting having taken this painting any further than this stage. Two years later, after much study , workshops, as well as two more years of teaching my pastel classes under my belt, I see that THIS is the painting I had wanted to do! I jave been struggling with leaving detail OUT of my work, letting the feeling of the place reign, rather than the worrying the little details to death!

Step 6. However, I DID continue on this painting, and here is the final result. I built up the warm greens of the grasses, the cooler, darker blues in the background, and added details of shrubbery, the right foreground tree, and some flowers. 
 Not sure which I like best, but since the Step 5 one no longer exists, other than beneath the finished one, I guess I have to be happy! Maybe I will do a whole new painting!
 For those who are interested, I painted this on 400 Uart sanded paper, with Terry Ludwig pastels.


Monday, June 6, 2016

Beach Scene for a Rainy Day

While we wait for the Tropical Storm to pass, we have a rainy windy day, here in southwest Florida. I thought I'd put up a blog from awhile ago, of a beach scene begun with an alcohol wash. I started with a photo from a hot day at Boca Grand beach, but decided to make it less elongated, with more of the beach.
Finished Painting
Original Photograph
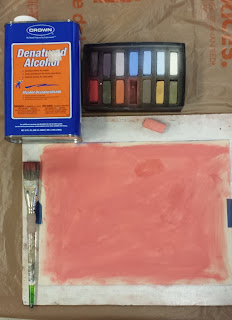
First Step: Tone the surface
I chose a hot pink pastel to wash in with alcohol, to help show the heat of the day
Step 2. Begin pastels
Here I have covered the painting with the colors I am using for this heated afternoon. The water is very turquoise, the sky almost pink with the humid haze. I have also blocked in some of the sea grapes that grow on the sand, and a few clumps of sea oats, to round out the composition.
Step 4, More color and form
I am working on the sea grapes, with some dark purple and light oranges and reds, still mostly hot colors, showing stems and leaves., I don't want to have too much detail in the finished painting. I have established the sizes of sea oat clumps, added shadows under them with a dusky blue,and added a little strip of land on the horizon, This is a channel between two islands. The sand was white hot!.
Step 5, and finished
"Hot Noon at Boca Grande Beach" ,8" x 10"
Cooled off the pink of the sky a bit with a pale yellow, added some warm greens for the leaf shapes, and am calling it finished. Just a little study, as a class demo of using the alcohol wash to underpaint a color to help create a mood or feeling for the day

Saturday, June 4, 2016

Self-Prepped Surface


Reference Photo
For this blog, I am showing you one method of making your own sanded surface for painting with pastels. I do NOT like what is called "pastel paper". I always use one kind or another of the commercial surfaces made specifically for pastel. There are several ways to create your own, for more texture, or to save money, or just to experiment. This is one of those experiments. I am using my photo of a local park trail, but this method could be done en plein air too. Do the first step before you go out ...saves time in the field.

Step 1. I started with a piece of acid free mat board, in a dull reddish color, with the waffle texture. I coated it , using a small roller, with clear gesso.
This is what I used, to avoid confusion. Clear gesso. Goes on white, dries clear. I did two coats. You can use a brush to get more texture, if desires, but for this painting I rolled it on to make a uniform surface. Next blog will be fun with textures.
Step 2. Now it's time for pastel. I used mostly Prismacolor Nupastels for this step, lightly stroking over the surface, for my underpainting.You can see the color of the mat board in the corners where the tape is not covering it.
This will be a mostly green painting, so I used warmer colors, plus a dark blue for the deepest shadows. The dark blue has had the alcohol brushed on, as I start that step. I am already establishing my darker and lighter value areas, as well as the temperatures I hope to end up with.
Step 3. Alcohol wash
Here is what it looks like after I have brushed it with denatured alcohol. I used a 1/2" flat bristle brush, cleaning the brush between colors, so as to keep them separate. I use various brushes at different times. At this stage, it can look rather chaotic, so it's good to keep your reference photo nearby!
Step 4. Now for the fun part, painting! I used mostly Terry Ludwig soft pastels, as I like the square shape, the heavenly buttery feel, and the size. I also use a few Schminkes, and Unisons, for their round shape and soft application. They blend over the Ludwigs beautifully.
Here I have laid down the intended values and colors, working to get the atmospheric perspective indicated with cooler green-blue, as well as the cool shadows, and spots of sunlight on the foreground. The sun is coming from the left, hitting those bushy trees on the right, so they get warm yellowish greens.
Step 5 Problem. This surface is very gritty. With two coats, it has a less-than-matte finish, and I was having trouble keeping the pastel ON! Typically, as I work, I will tip the piece sideways and gently tap it against the table to shake off any loose dust. There is usually not much at all, when I use Ludwigs, regular sanded paper, and my light strokes. With this surface, a LOT of dust comes off. So I used "workable fixative" several times during the various layers. See photos below for what happens before and after spraying. I used Krylon, which promises "invisible protection without without dissolving whites and lights". See for yourself! Comparison photos below.Spraying definitely dissolved the top layer of light pastel, among other things. So I just kept applying pastel, and gave up spraying, after two tries. I usually give my paintings a hard tap against the table once they are ready for framing, to make sure there is little or no loose pastel dust that can come off under the frame. With regularly available paper (Uart, Pastel Premier, Art Spectrum Colourfix, etc) this is not a problem.

After spraying

Before spraying
...


.Step 6. To Finishing. I wanted to make sure my values were correct so took a photo in grey scale, with the original photo of the scene.
This was taken after the last spraying. 


I can see I need to lighten the overhanging tree branches, add more "sky holes"; brighten up the right trees, and especially lighten the foreground grasses and sun spots.
 
"Out of the Shadows" 10" x 13" unframed. Available for $100.00, free shipping. Contact me here.
In the end, I decided to keep the overhanging branches dark, to give the feeling of deep shade. I am pretty happy with the result, but I intend to work more with this surface, on other paintings, to see if I can get a more adhesive surface, without using fixative. I will also experiment with this and other textural applications, to create paintings with actual texture...for grasses, perhaps a look of brush strokes. That will be next week's class, and blog.

Monday, May 30, 2016

Just Blues


I have been working on paintings with limited palettes, for several shows I am entering. I am finding this is a wonderful way to learn values and temperatures better, and it is resulting in some very interesting paintings. This one is "Just Blues". It's a photo from the Celery Fields in Sarasota FL, where I was painting en plein air several months ago. This is on the path that winds up and around the tallest hill in Sarasota County!


This blog is a step-by-step creation of a pastel painting done all in blues, beginning with an alcohol wash, to tone the surface. I started with white Wallis Museum paper, mounted on foam core. After lightly stroking my chosen violet pastel on the surface, I brushed it evenly with denatured alcohol.
Step 1. The two pastel sticks are the colors I used for the alcohol toning, mostly violet with a light bit of the pale blue where the sky will be. The dark violet marks are my first dark strokes (I forgot to take the initial photo until I had done these!)
Next I began blocking in the dark and lighter value shapes

Step 2. Here you can see that I have lightly covered most of the surface with some of the colors to the right, to establish my value and shape design. You can see my reference photo, which I printed in grey scale, so I could concentrate on the values, rather than local color, since this is to be all blues.

Now I begin to develop the idea further
Step 3. I begin adding some other colors, including a blue green, as an undercolor for the grass. Just because I am limiting this painting to blues does not mean I cannot have other hues beneath those blues, to enhance the effect. You can see various blues, violets and turquoise sticks next to my painting. I work with a towel under the work, so I can wipe each stick clean before making a mark.
Further development of lights and darks, including the sky.
Step 4.  I am now working on the sky, and some darker areas of the shadows. The day was cloudy, with some grey clouds scudding along in the distance. I begin to add some detail to the palms
 Time for shadows and detail
Step 5 to the finish. I take a day to evaluate where I need to add, subtract or change color, value, temperature, even compositional elements like shadows. Here I have mostly worked on the tree trunks and fronds.I can see the shadows on the path, the field to the left of the lone palm, etc, all need work, as well as the grassy area in front. I also notice I forgot the side path, going behind the two front palms, along the hill leading right from the main path. 

Finished Painting, "Just Blues", 11" x 14", available unframed for $75.00